


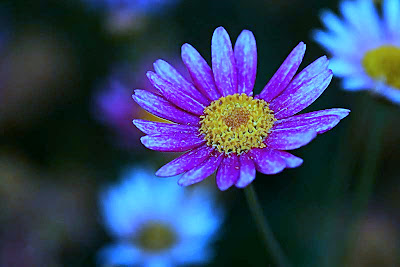
போன முறை மாதிரியே அதே படம், அதே கலர் சரியாக்கும் முயற்சி ஆனால், இது வேறு ஒரு முறையில்.
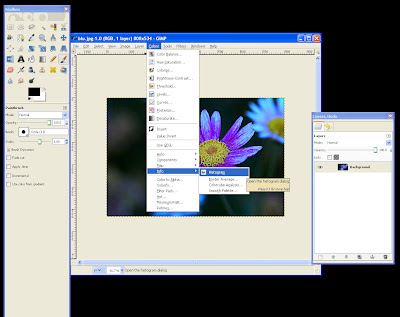
படத்தை கிம்பில் திறந்து Colors->Info->Histogram தேர்ந்து எடுங்கள்
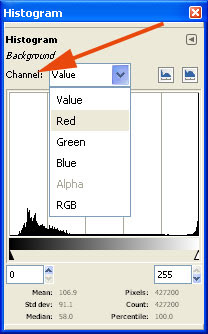
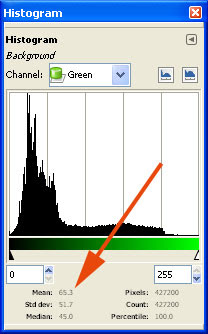
Histogram ல் Value, Red, Green, Blue என்று நான்கு பிரிவுகள் இருக்கும்.
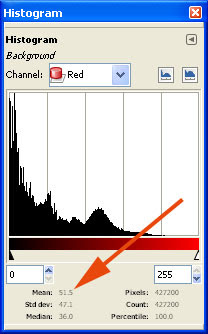
முதலில் Red தெரிவு செய்ய்ங்கள். படத்தில் குறித்தப்படி Mean பகுதியில் இருக்கும் அளவை குறித்து வைத்துக் கொள்ளுங்கள். இந்தப் படத்தில் இந்த அளவு 51.5
( Median, Mean , Standard Deviation எல்லாம் எட்டாம் வகுப்பில் படித்து இருப்பீர்கள், ஞாபகம் இருக்கா ? கணக்குப் பாடத்தை கவனிக்காம, வேறு எதையாவது கணக்கு பண்ணிக்கிட்டு இருந்தீர்களா ? ).
அடுத்து Green, இதன் அளவு 65.3
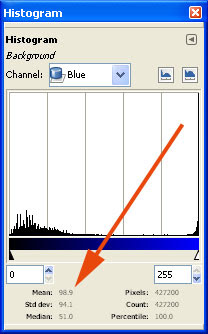
அடுத்து Blue, இதன் அளவு 98.9
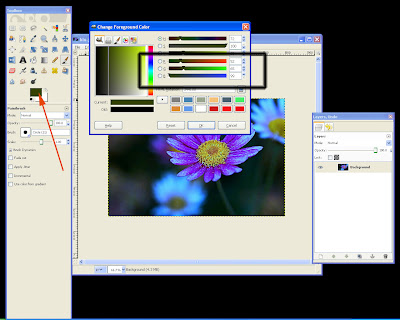
முன்னணி வண்ணமாக இந்த அளவின் வண்ணத்தை தேர்ந்து எடுத்துக் கொள்ளுங்கள். நான் முழு எண்ணாக, 52,65,99 தேர்ந்து எடுத்துக் கொண்டேன்.
இனி ஒரு புதிய லேயரை உருவாக்கி அதை இந்த வண்ணத்தால் நிரப்புங்கள்.
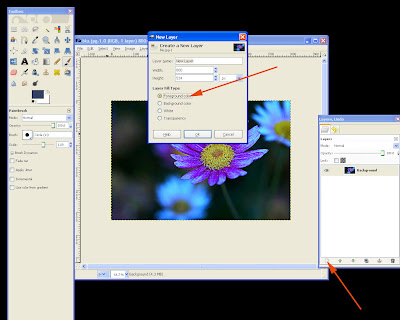
சரி, இது வரைக்கும் நாம் செய்தது என்ன ? முதலில், படத்தில் இருக்கும் சராசரியாக வண்ணத்தை Histogram மூலம் கண்டறிந்து அதை நிரப்பி உள்ளோம்.இந்த வண்ணத்தை தான் படத்தில் இருந்து நீக்க/சரி செய்ய வேணும். அதற்கு எளிய வழி, இதற்கு நேர்மாறான வண்ணத்தால் படத்தை நிரப்புவது.
அதற்கு Colors->Invert
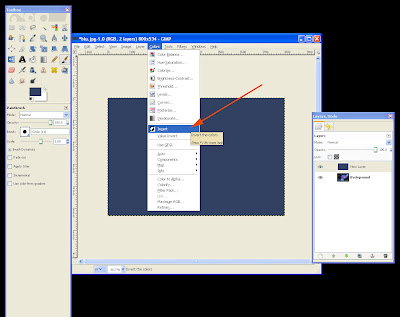
அடுத்து Mode -> Color
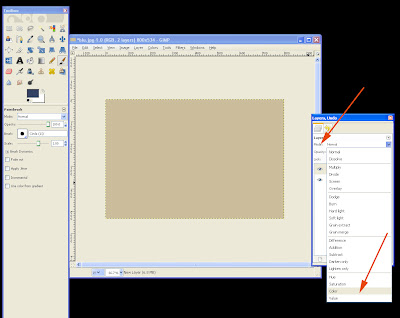
இனி Opacity குறைத்துக் கொள்ளுங்கள். பொதுவாக 20 % - 40% உங்களுக்குத் தேவையான அளவிற்கு மாற்றிக் கொள்ளுங்கள்
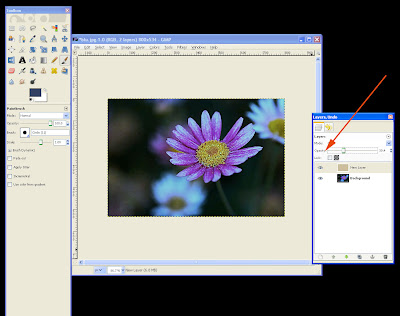
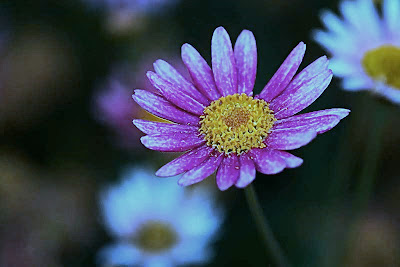
படம் சரியாகி இருக்கும்.

படத்தை கிம்பில் திறந்து Colors->Info->Histogram தேர்ந்து எடுங்கள்

Histogram ல் Value, Red, Green, Blue என்று நான்கு பிரிவுகள் இருக்கும்.

முதலில் Red தெரிவு செய்ய்ங்கள். படத்தில் குறித்தப்படி Mean பகுதியில் இருக்கும் அளவை குறித்து வைத்துக் கொள்ளுங்கள். இந்தப் படத்தில் இந்த அளவு 51.5

( Median, Mean , Standard Deviation எல்லாம் எட்டாம் வகுப்பில் படித்து இருப்பீர்கள், ஞாபகம் இருக்கா ? கணக்குப் பாடத்தை கவனிக்காம, வேறு எதையாவது கணக்கு பண்ணிக்கிட்டு இருந்தீர்களா ? ).
அடுத்து Green, இதன் அளவு 65.3

அடுத்து Blue, இதன் அளவு 98.9

முன்னணி வண்ணமாக இந்த அளவின் வண்ணத்தை தேர்ந்து எடுத்துக் கொள்ளுங்கள். நான் முழு எண்ணாக, 52,65,99 தேர்ந்து எடுத்துக் கொண்டேன்.

இனி ஒரு புதிய லேயரை உருவாக்கி அதை இந்த வண்ணத்தால் நிரப்புங்கள்.

சரி, இது வரைக்கும் நாம் செய்தது என்ன ? முதலில், படத்தில் இருக்கும் சராசரியாக வண்ணத்தை Histogram மூலம் கண்டறிந்து அதை நிரப்பி உள்ளோம்.இந்த வண்ணத்தை தான் படத்தில் இருந்து நீக்க/சரி செய்ய வேணும். அதற்கு எளிய வழி, இதற்கு நேர்மாறான வண்ணத்தால் படத்தை நிரப்புவது.
அதற்கு Colors->Invert

அடுத்து Mode -> Color

இனி Opacity குறைத்துக் கொள்ளுங்கள். பொதுவாக 20 % - 40% உங்களுக்குத் தேவையான அளவிற்கு மாற்றிக் கொள்ளுங்கள்

படம் சரியாகி இருக்கும்.


nice :)
ReplyDeleteகணக்குப் பாடத்தை கவனிக்காம, வேறு எதையாவது கணக்கு பண்ணிக்கிட்டு இருந்தீர்களா ?//
ReplyDeleteஅப்புடி போடுங்க நீங்க கேக்காததுதான் பாக்கி... கவனிக்கிறதுனா எனக்கு அலர்ஜி...
இது அருமையான டெக்னிக், try பண்ணிட்டு சொல்றேன்..
சர்வே
ReplyDeleteநன்னி
ஆ !
அப்ப கவனிக்கலன்னாலும் பரவாயில்லை, இப்ப கத்துக்கலாம் !
you made my day ........ corrected a portrait, which i was trying for a long time through the "colour balance" dialog; can you post/provide link on highlights, midtones and shadows - correcting colours.
ReplyDeletebtw, can we generate HDR in GIMP, from 3 or more autobracketed images.
//btw, can we generate HDR in GIMP, from 3 or more autobracketed images
ReplyDeleteYes, you can do simple exposure blending very easily.
For eg, please have a look at this post.
http://photography-in-tamil.blogspot.com/2008/09/exposure-blending.html
I think there are few scripts available in
registry.gimp.org which can simplify.
http://registry.gimp.org/node/6708
Hope it helps.
there is also a tool called tufuse.
http://www.tawbaware.com/tufuse.htm
which has a simple command line options and also qtpfsgui
http://qtpfsgui.sourceforge.net/
Lot of options